Friday, July 9, 2010

THE ULTIMATE SCALE BOOK

ult


Total Guitar’s techniques team have attempted to cram as much as possible into the 30 pages of this Guitar Scale Ebook you have in your hands. As well as a complete run-down of all the most useful and usable scale shapes in several positions, They’ve included soloing tips, a little music theory, plus some chord sheets and tab exercises to try the scales with. Don’t use these scales in isolation though – the book is primarily intended for reference. The only time a scale becomes worth listening to is when you make a great solo out of it… Enjoy this Free Guitar Scale Ebook.


Download

Saturday, July 3, 2010

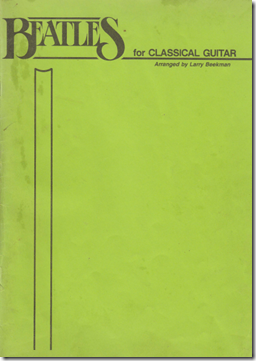
Beatles for Classical Guitar (Arr. L.Beekman)

Capture


Beatles for Classical Guitar (Arr. Larry Beekman)


More than 25 of the Beatles greatest hits arranged for classical guitar.


Contents:


- Across The Universe


- Ask Me Why


- Come Together


- Cry Baby Cry


- Day Tripper


- For No One


- From Me To You


- Hello, Goodbye


- Here Comes The Sun


- I Don't Want To Spoil The Party


- I Will


- I'll Follow The Sun


- I'm A Loser


- I'm Happy Just To Dance With You


- I'm Only Sleeping


- I'm So Tired


- In My Life


- Long & Winding Road, The


- Maxwell's Silver Hammer


- No Reply


- Nowhere Man


- P.S. I Love You


- Penny Lane


- Something


- This Boy


- Things We Said Today


- Two Of Us


- While My Guitar Gently Weeps


- Yesterday


- You're Going To Lose That Girl


Download

When Does Interpretation Start?

When does one begin to develop an interpretation of a piece? The common wisdom is that you learn to play it first, then add in the “musical stuff” later.


That’s a flawed conception. It treats a piece as two separate entities: technique and physical movements vs. musical elements and interpretation.


The way we execute a piece physically (technique) is a direct product of interpretation. Playing a diminuendo requires a different sort of technique that just playing at even volume. Forte feels different in the fingers than piano.


So in a sense “learning” a peice first, then adding musical elements is like learning two sets of movements. And considering that most guitarists only interpret as an afterthought to finger wiggling, we’re left with a majority of our practice time devoted to a dry so called “un-interpreted**” version of a piece that comes out on stage because we spent more time practicing that way.


Practice and incorporate musical elements from the start of working a piece, and ingrain those movements from day one. Of course you’ll change things along the way and be able to do more interpretive elements, but it can’t hurt to get a head start.


**There’s no such thing as uninterpreted music. Even the lack of making a choice about a musical element is making a choice about the element, and it still results in an “interpretation” that comes out of the player.

Thursday, July 1, 2010

Practice Techniques: Changing the Rhythm

Sometimes there are sections that always sound uneven. Altering the rhythm can give a player more control, and help even out those difficult passages.


It’s as simple as it sounds. Have a passage in fast 16th notes? Try playing in triplets or quintuplets–the notes don’t have to move faster or slower, the accents just shift around. The options are infinite. This technique can work with anything, and it does help expose hidden issues.


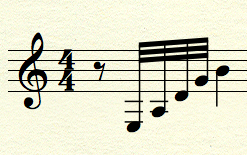
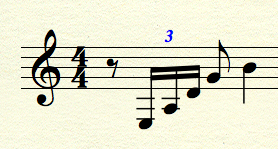
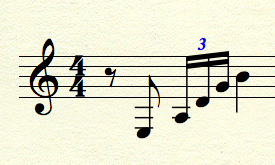
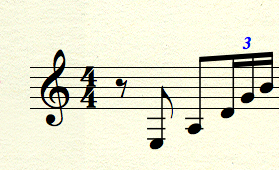
For instance: I have a quick chord to play that is essentially rolled, but it’s notated in 32nd notes. The tempo is pretty slow, so the composer obviously meant the chord to be measured and even–the 32nd notes are to sound like 32nd notes. So I tried it with various rhythmic permutations. Here’s the original on open strings, the RH fingering p p i m a:


fast-chord-original


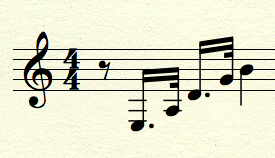
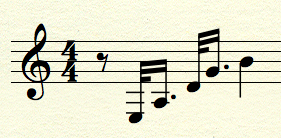
And here are some of the rhythmic alterations I tried out:


fast-chord-2


fast-chord-3


fast-chord-4


fast-chord-5


fast-chord-6


The end result is that I discovered I have the tendency to play m a as a unit. This is not something that happens when I just play a quick ascending arpeggio p i m a. Whenever I have to drag my thumb in time, it throws off my hand position a bit, requiring some compensation. Because I noticed what was going wrong, I can now work on controlling it.


Altering the the rhythm of a passage is a great help.

Saturday, June 12, 2010

Practice Techniques: Dynamics

This is a right hand practice technique which works extremely well for nailing down a repeating arpeggio pattern.


Loud and Soft


It feels different when playing loud or quiet. Practicing quietly feels almost like your fingers are floating, and it takes a lot of control to not have certain notes accent; practicing loudly gives the impression of fingers flying wildly and it’s a challenge to avoid crashing. Practicing quietly makes it easy to go quick; practicing loudly* feels heavy, awkward and slow.


In short, it’s a good idea to practice a pattern both as loud as possible and as quiet as possible. It forces your hands to go further than may be necessary on a pattern and makes that pattern more secure at a normal volume.


Crescendo/Diminuendo


The concept is easy. Keep playing a right hand pattern, start quietly, slowly swell to as loud as possible, then take it back down. It’s hard to actually do this. The benefits is the same as above: takes the pattern further than necessary and teaches control and makes the pattern more secure.


Not everyone can jump right into this right away, but it can be built up. Start with just two dynamics (piano and forte) and keep alternating between them every few patterns, being careful not to stop. Then add in another dynamic level: start piano, then play mezzo forte and finallyforte, then step back down. Then mezzo piano can be added in making four steps. Finally try swelling up and down more naturally.


The whole idea behind using dynamics as a strictly practice method is to develop control. The Crescendo/Diminuendo technique is very close to guitar magic (seriously,it’s that good) because it’s develops some extreme control. Try it out! Let me know how it works!


*Loudly and Forte, in this article, mean as loud as possible. In the same way, quietly or pianomean as soft as possible. Sometimes piano can even mean sort of ghosting (barely playing) the right hand.

Tuesday, June 1, 2010

Slow Fast Alternation

Slow-Fast alternation is an extremely useful practice technique. And it’s exactly like it sounds: play something slow, then play it at tempo and continue alternating the two ideas. When starting to work on a rough bit, it’s important to spend more time on the slow part. Something like a 4 or 5:1 ratio of slow:fast would work well. Gradually the ratio can be worked down to 1:1. Slow-Fast alternation is best used with small portions rather than entire works.


I like to use this analogy with my students: It’s like a video game. The programmers write the code and design the game making it work exactly as they mean too, then the player executes the program and plays the game. The slow part is the programming, making your fingers do exactly as you want them; the fast is the execution, running the program.


Metronome, friend or foe?


Maybe both. Forcing tempo up with a metronome, even using slow-fast techniques, can sometimes lead to increased tension – especially with beginners. Use the metronome wisely, but if you feel that it is pushing you too hard and tensions enters your hands put the metronome down.


From my personal experience utilizing slow-fast techniques with technical exercises has tremendously improved my speed and accuracy, and I have not used a metronome on a tech exercise for about six months now. Developing good movement patterns seems to be king, and that can be done without a click track in the background.

Friday, May 28, 2010

Discover Your Discomfort! by Jamie Andreas

Discover Your Discomfort! Why Are So Many Guitarists Masochists? By Jamie Andreas www.guitarprinciples.com


Okay, I’m going to explain some powerful things for anyone who wants to see RESULTS from their guitar practice, and really learn how to play the guitar well. In other words, the guitarist who wants to do what I call CORRECT PRACTICE.


Have you ever had trouble playing something on the guitar? Have you ever seen or heard someone play something, tried to do it yourself, maybe practiced it for a long time, and ended up with only frustration and bad feelings about yourself as a player? Be honest now. I’ve been playing for 30 years, and giving guitar lessons for 27 years, and I have never met a player, including myself, who could honestly answer no to that question.


There are a few things that are always true when we are unable to play something we want to play on the guitar.


One of the things that you will always find, if you look for it, is what Aaron Shearer called, in his first book, uncontrolled muscle tension. Many, many players have in fact commented on this fact, mainly because this fact becomes obvious to anyone who plays for awhile, pays attention, and starts to discover the path to gaining increasing ability on the guitar. Many people mention it. The problem is they never tell you what to do about it!


Oh sure, you’ll hear people say "play S-L-O-W-LY", or "RELAX"! I asked, ordered, screamed, and pleaded with students to do that for probably 20 years, before I realized that almost no one was listening to me, or maybe they didn’t believe me, or maybe they thought I was kidding (well, his face is turning purple, but, nah, I don’t think he’s serious)!


No, it seems most people would rather try to play that bar chord or that scale with their shoulders tensed up to their ears, their pinky tensed up and pulled 2 inches from the neck as they dislocate their shoulder trying to get it to it’s note on time, practice and play that way day in and day out, and then wonder why they find that scale hard to play, that it breaks down at a certain speed. Or maybe they wonder why they have a pain here or there. Hell, they may be really persistent and keep at it till they qualify for this new disease I’m always reading about, Repetitive Strain Injury.


I got a new student about a year ago, we’ll call him Tom. Now Tom had been teaching himself for a few years, is very musical, very intelligent, and managed to learn fingerstyle guitar well enough to attempt some rather challenging pieces, including some classical repertoire. In fact, he would play for friends and often impress them.


However, it was also true that he knew he never played anywhere near his best in these circumstances, and the piece would often break down somewhere. It was also true that he had a growing pain in his left shoulder when he practiced. Tom has two very important qualities that a player must have in order to overcome problems, and make what I call Vertical Growth. Those two things are Desire, and Honesty.


Tom doesn’t have the pain in his shoulder anymore, and his playing is getting better and better. This is because he has learned a few things. He has learned about the incredible state of muscular relaxation that a player must have as they play. He has learned how difficult it is to actually make sure you have that relaxation as you play. He has learned about Sympathetic Tension, how every time you use one muscle, others become tense also, and how if you are not aware of it, and allow it to be there, it becomes locked in to the muscles through the power of Muscle Memory.


Tom is also learning, over time, that by always making the effort to focus his attention on this muscle tension, he can always eliminate some part of it, and by consistently doing this in practice, things begin to feel easier and easier, because he was really fighting his own muscle tension, which made it feel so hard.


Tom inspired me to invent a phrase, something for him to always keep in mind when he practices. In fact, I told him to do what I do. Write it out on a sign and keep it somewhere in front of him as he practices. On the music stand or taped to the wall like I do. The phrase is "DISCOVER YOUR DISCOMFORT". Pay attention, notice what happens in the body as you play. How does it feel. Good players are not experiencing that discomfort when they do the thing you struggle to do. If they had to struggle they wouldn’t be good players!


Now as usually happens, I began to use the phrase myself, and began to discover new levels of my own discomfort. And I began to see my playing improve, I mean fundamentally improve. You see, there is no end to this process.


Why do so many of us allow such discomfort when we practice and play? There are many reasons, I’ll go in to them at another time. What I want to do now is give you some ways of discovering your own discomfort, and begin to minimize it.


  • Hold the guitar as comfortably as you can.

  • Allow your left arm to hang limp at your side.

  • Place your right hand fingers on the strings, keeping them very loose and relaxed. If you use a pick, float the pick in between two strings and keep it there.

  • Focus your attention on your shoulders, as you raise your left hand slowly. Raise it straight up without extending it, and place all your fingers on the sixth string, around the tenth fret. Keep them on the string so lightly, you don’t even press the string down. (Not easy at first)!

  • Do you feel anything in your right shoulder as you do this? Do you feel any tightness come in to the pick hand, perhaps you are gripping the pick tighter, or tensing your wrist? Be honest now.

  • Keeping your left hand fingers on the string lightly, begin to move your hand down toward the first fret. You must do this VERY SLOWLY. Notice what happens throughout your body. As I have had students do this, I have seen everything from tense ankles or belly, to practically falling off the chair!

I hope I have provided a starting point for further investigations and insights for you. Take anything you find hard to do, stop yourself in the middle of it, and check out what is happening in your body. You will be amazed.

Copyright 2000 Jamie Andreas.All rights reserved.

Thursday, May 27, 2010

Three Great Websites to Help Practice Sight Reading

  1. http://practicesightreading.com/. Rhythm is one of the most important things in sight reading. You could approximate the melodic shape, hitting only half the notes, but if the rhythm were correct, it wouldn’t sound half bad. Practice Sight Reading.com automatically generate rhythm exercises of various lengths to work on. I’d recommend practicing these things a few ways: (1) clapping the rhythms, and (2) playing them on a single string on the guitar. Rhythm studies are actually a huge part of any college level ear training course–I had to buy an entire book of them (a $50 book!).
  2. Guitar School Iceland. Everyone knows about this website. My particular favorites for sight reading are the collections especially the “Guitar Moments I-IV,” which are graded. The “Guitar Tunes” collection is also good (all single line melodies).
  3. The Boije Archive is a collection of 19C guitar music. Once you’re a bit more confident in your sight reading, try reading through the various 19C guitar methods: Carcassi, Sor, Aguado, Coste/Sor. Or try reading through easier etudes. Sor’s Op. 60, 44 and 35 are all good options.

(1) Playing in time, (2) playing the correct rhythms, and (3) playing the correct notes are all important in sight reading. Being in time and correct rhythm are king. The right notes are nice too, I guess. Remember to try and focus on looking ahead a beat or two.


If you find yourself lost sight reading even the simplest pieces, try playing only the melody or one voice at a time. Or, barring that, you could try reading music written for single-line instruments. For instance, the Clarinet shares the same general range (on the staff) as the guitar (the guitar sounds an octave lower than written, however). Vocal melodies are also an option. There’s a lot of public domain music to be found on the International Music Score Library Project to help you out.


Just a few minutes of sight reading practice each day can make a huge difference.

Wednesday, May 26, 2010

Sight Reading Tip: Look Ahead

Sight reading is a tricky monster for guitarists. Really the best way to get better at it is to read more. With the plethora of free sheet music online, it’s not hard to find music for reading.

The trick of sight reading is look where you’re going, not where you are. That is, look ahead in the music a half beat or a beat. This goes for anything from a chord chart to a classical guitar piece. By the time you reach a note, it’s too late to think about it.

It can also be helpful to play things in many positions. So if something fits well in first position, don’t just leave it there, try it up higher. In real performance or practice however, the easiest or more fluent fingering should be used.

Tuesday, May 25, 2010

Bach: Bourree in e-minor by Per-Olov Kindgren

Here comes my favorite guitarist Per-Olov Kindgren plays the famous Bourree from lutesuite nr. 1 in e-minor

Saturday, May 22, 2010

Damping Technique For Guitar

Correct execution of string damping technique is a very important requirement for achieving a polished performance.


The main reason for damping a note, apart from the obvious one of artistic articulation, is to prevent a sustained open string from clouding the harmony when there is a harmonic change in the composition. For example a low open A bass note will continue to sound for as long as the string will sustain. If during this sustain the harmony changes to a dominant E chord the open A string will combine with the newly played notes to produce an unpleasant discord. In this case the open A string should be damped slightly before the change in harmony. This is achieived by placing your right thumb momentarily back on the vibrating A string just before playing the next chord.


The other method of damping is to simply lift the left hand fingers from the note but obviously this will not work on a open string.

Saturday, May 15, 2010

Lagrima – Francisco Tarrega

Lagrima should be played with a lot of feeling. It is of moderate difficulty, but should be very attainable if one pays close attention to the fingerings of the left hand. The repeated open B should be subdued, allowing the beautiful melody to ring through. On the repeats try to change the dynamics a little. Rolling the double stops, (two note chords), here and there, will add character as well.


I found these 2 videos from Youtube, explaining both Right hand and Left hand technique for Lagrima.


Part 1:  The Right Hand Technique


Part 2: The Left Hand Technique


Score can be downloaded here:

http://guitarvlog.blogspot.com/2010/02/solos-for-classic-guitar-world-favorite.html

Saturday, April 10, 2010

Left Hand Position

Thumb Position


The thumb is key to being agile on the fretboard.  The thumb should be square on the back of the neck.  It should not wrap round even a little.  Someone sitting directly in front of you should not be able to see any of your thumb.  The reason for this is that your thumb provides a stable and solid base for the fingers to fret against.  The thumb should be pushing in the exact opposite direction your fingers are pushing on the fretboard.  If it is pointing at an angle away, the neck is less stable and more likely to slip.  Also the fingers can accidentally stretch the strings and change the note you are playing.  This effect can be desirable in many situations but it should always be under control.


Active Fingers


The active fingers are the fingers which are actually pressing down on strings at any one time.  The position of these is very important.  The final joint should be as close to perpendicular to the fretboard as possible and as close to the fret wire as you can manage without actually touching it.


I find that a little nail is useful on my left hand since it provides support for the rest of the finger but you should always aim to be making the contact with the fleshy tip of your finger.  This gives a much smoother tone and lessens the hammer effect of banging your fingers so hard onto the fretboard that they create a note without any right hand action.  Often the hammer and snap are desirable but, as with everything else to do with the left hand, control is so so important.  You only want to be hammering notes when the music tells you to.


Inactive Fingers


The inactive fingers are the ones that aren’t fretting strings at any given time.  They should be hovering as close to the fretboard as possible without touching the strings.  It is unlikely that any finger is going to be inactive for very long so it should always be in a position where it can fret a string quickly.  It also looks a lot nicer for someone watching the artist.  The hardest finger for me to control in this way was my little or fourth finger.  It is so important to be able to control this finger and it took a lot of practice and concentration to reign it in but it is totally worth it.  A fourth finger which is under control is one of the greatest assets a classical guitarist can have as it makes longer stretches and intricate holds possible and, with practice, easy to do quickly.


As with the active fingers, the final joint of the inactive fingers should be as close to perpendicular to the fretboard as possible.  The actual fretting should come from the first finger joint and the angle between the second and final joint should hardly change through fretting and releasing the strings.


Individualization


Each finger should be able to move independently of the others on your hand.  This is especially hard considering your fingers often share tendons but with a lot of practice it is possible to get close to total individualization.  It is something that every guitarist should work on every time they practice.  Here is an example of an exercise:


(6i) 4 2 3 1 (5i) 4 2 3 1 (4i) 4 2 3 1 (3i) 4 2 3 1 (2i) 4 2 3 1 (1i) 4 2 3 1


Where the bracketed number and letter represent the string and the position in Roman numerals.  (6i) represents first position on the sixth string.  This pattern should be repeated up and down the strings.  Take time with every note you fret and make sure that it is as close to perfect as possible, each and every time.  I mentioned before that being in a zen type meditative frame of mind when doing these exercises is the best way and this is no exception.  It is harder than the last one for me and requires a great deal of concentration to make sure everything is as perfect as it can be.


Finally


I can guarantee your hands won’t thank me for this exercise at first but persevere.  At least 10 minutes every practice session along with the other exercises presented in the previous article and you will be well on your way to having a strong and dexterous left hand to match your finely tuned right hand.

Thursday, April 8, 2010

Rest and Free Strokes

There are very few techniques that I can think of for right hand guitar playing across all genres of music.  Since this post is specifically to do with Classical, or more generally nylon strung, guitar technique I will focus on the two that are most commonly used and should become second nature to any serious guitarist.  I will talk about the rest and free strokes.  They have Italian names too, but I don’t want to confuse the matter (and I can’t remember what free stroke is in Italian either!).


Firstly the physics of how a guitar makes noise.  The string vibrates up and down, or perpendicular the plane of the soundboard.  This came as a surprise to me when I first heard it, I assumed they vibrated parallel to the plane, but it is an important fact to remember when practicing the techniques I am about to describe.  This vibration goes through the bridge and is amplified by the top surface of the guitar and the air inside.  The guitar body acts in a similar way to a speaker and pushes air backwards and forwards creating sound.


The Rest Stroke


The rest stroke is probably the singular most used technique a guitarist will use so it is very important to get it right.  The hand position should be right over the sound hole.  There are 4 phases of the rest stroke:

  • Guitarist pushes down on the string
  • String slips over nail pushing it down and is released
  • Finger follows through onto next string and rests on it momentarily (where the name rest stroke comes from)
  • Guitarist repositions finger ready for next stroke

This is the technique used by bass players who play with their fingers for the most part.  It is a very direct and punchy style of play, allowing each individual note to be heard.  It should be used whenever only a single note is being played at a time, in melodic passages.


The first stage is probably the most important.  Remember at the start of the post I said that the string needs to be vibrating up and down?  If you push the string at an angle towards the string above it, the string will vibrate at an angle.  It will settle down to the perpendicular path it naturally wants to follow but it won’t be immediate.  Only the component of the movement which is perpendicular to the soundboard will be amplified and by the time the string has found it’s natural path, the stroke’s initial amplitude will have decayed away.


Techniques to improve this include 4, 3, 2 and 1 notes on each string with varying right hand finger patterns, for example:


6i 6m 6a 6i 5m 5a 5i 5m 4a 4i 4m 4a 3i 3m 3a 3i 2m 2a 2i 2m 1a 1i 1m 1a and back


Where the number is the string and the letter is the finger (i = index, m = middle and a = annular or ring finger).  Finger patterns to use include alternating i-m-a, as seen above, i-m, i-a, and m-a.  When doing these exercises, don’t do anything with your left hand but focus on the smallest movements of your right.  Focus on the following:

  • Pushing down as close to perpendicular to the soundboard as possible
  • Only moving one finger at a time (also known as individuation)
  • Hand position try varying slightly and seeing what the effect in tone is

I like to try and get into a zen state where I concentrate on perfecting each individual movement no matter how small so I can get the maximum potential out of my hand and instrument.  You can spend a long time on this.  Everyone wants to play the cool pieces because they sound good. 


The Free Stroke


The free stroke is different to the rest stroke because you don’t have the rest.  It is used for playing chords, arpeggios and passages where the notes should ring together.  The technique is subtly different but leads to a noticeable change in the way the instrument sounds.  It is probably easier for a beginner as the technique always felt more natural to me but it isn’t as widely used and is only used for certain effects.  The rest stroke should still be your main stroke.  The technique goes something like this:

  • Guitarist tries to rest nail underneath the string and pulls upwards
  • String slips over nail and is released
  • Guitarist positions finger ready for next stroke

Again, the first stage is probably the most important.  It is difficult and impractical to get the finger completely under the string and even if you were to, you would really only have an inverted rest stroke.  You should be pulling the string back softly and letting the string follow it’s natural path in space rather than trying to direct it to only go perpendicular to the sound board.  This results in a softer, more airy tone.


The same exercises can be used to practice this technique as before.  Again, trying to focus on getting the most out of every movement and maximizing the potential of you and your instrument.


I was told to spend 10 – 20 minutes a day practicing these techniques but really you can’t do enough of this.  You should keep doing this, no matter how good you are for at least 10 minutes a session and if this is the first you have seen of them, it might be worth spending a minimum of 20 minutes a session on them with the upper time limit being up to you.  The more the better!  Remember:  Amateurs practice until they get it right, pros practice until they can’t get it wrong.

Wednesday, March 31, 2010

Guitar Speed and Dexterity

"Position, relaxation and attack all have to be taken into consideration and have to be trained in order to achieve your desired guitar speed but there are other techniques that help as well. Guitar speed should never take priority over purpose. Use it only to enhance melody."

To begin with, let me give you a couple of rules that I go by and then a few guidelines that help when you think about using guitar speed as a guitar technique.


Rules for playing guitar fast
Rule 1:
You won't play fast with your thumb over the neck. You've got to stay in the light touch position as much as possible.
Rule 2:
You won't improve guitar speed with your wrist contorted.

Guidelines for playing guitar with speed
Guideline 1:
Place your notes well and use dynamics. Short bursts of speed well delivered sound as good if not better than long shredding solos.
Guideline 2:
Speed is relative. There are always faster players. Don't obsess over it.
Guideline 3:
Use a metronome as much as possible. Not only will it help your speed. It will help immeasurably with rhythm, timing, and clean technique.

Friday, March 26, 2010

Metronome Exercises: Tab

Even though up to this point I haven't explicitly written out to what you should set your metronome to, you should be using one whenever you practice any of the guitar techniques on this site. I'm going to go over a few exercises that will show some ways to implement a metronome into your scale runs and chord changes. Have fun and play around, experiment. Keep this in mind though.


Do not sacrifice clarity of tone for speed. Always work your way up to your fastest, clean playing. Practicing slow with a metronome will ensure that your muscles remember the correct form and position to get clear tone. The speed will naturally come. The following exercises are not designed for creativity, only for examining a way to use the metronome. If you are already familiar with it, simply move on.


Major Scale
metronome excercises

Guitar Technique: Metronome with Chord Changes


These exercises are very simple. Later in the Songwriting section when we talk about rhythm we'll take a more thorough look at the use of the metronome with chord changes and the specifics of quarter, eighth, sixteenth notes, etc. It's such a useful tool there will certainly be future studies for members in the coming months that dive into the nitty gritty of its use. For now take these exercises and play around, test your speed, experiment with rhythmic changes for the chords or emphasize different beats for the solo exercises. Thanks.


metronome exercises

Tuesday, March 23, 2010

Stretches for Guitar Players

Below are some stretching exercises to keep you warm and loose during your guitar lesson. Just take 2 minutes before you practice and you can save yourself a lot of trouble in the long run. The can help your guitar technique by keeping you loose and relaxed.


guitar stretching technique 1


I borrowed these exercises from Aikido but they have worked pretty well for me. With this exercise, grab around your wrist touching your thumb and middle finger if possible. Apply pressure to the backside of your hand with your wrist. Your elbows should naturally gravitate downward. This will strengthen your wrist and stretch the forearm.


guitar stretching technique 2

Grab the fleshy part of your thumb with your fingers. Your thumb should lie across the backside of your hand pressing on the bug knuckle of your middle finger. Push with your thumb and pull with your fingers. This will stretch the forearm and strengthen the wrist.


guitar stretching technique 3

Lay your hand out in front of you like you're offering something. Grab your fingers as shown and pull down and back. This will stretch the forearm and the wrist. It will also stretch the palm of the hand. Don't over do it.


guitar stretching technique 4


guitar stretching technique 5


This exercise will strengthen and stretch your hands and fingers. This is basically done the way it looks. (as the others) Put your fingers together like you're praying. Press them together and spread them apart at the same time. Again don't over do it and hurt yourself. Just get a good stretch. Below is the side view.


After you do these stretches, do some wrist circles clockwise and counter-clockwise. Then shake them out to get rid of the tension.

Saturday, March 20, 2010

Guitar Warm Up

Guitar Warm Up

Do you love to play the guitar? Well let's just say that if you do and you value the gift you've been given to be able to play, then you should take guitar warm up very seriously. Because if you don't, very bad things could happen.
Why warm up for guitar?

Sorry about the melodrama. But seriously, warming up properly can really reduce the possibilities of you developing injuries because of your guitar playing, specifically tendonitis, carpal tunnel syndrome or other repetitive stress injuries. (over many years of course)

Not to mention that warming up will make playing all the guitar techniques you learn here easier to execute.


How long should I warm up during my guitar practice?

I usually spend about 5-10 minutes warming up and cooling down. But it's important do both. Cooling down is just as important as warming up. Runners don't go out and do all out sprints without stretching and warming up. Nor do they simply stop and go about their business. Their bodies need to cool down. So does yours. Five to ten minutes should suffice for both.


What should I focus on when I warm up and cool down?
  • Focus on warming up and cooling down, not on building guitar technique.
  • Focus on relaxing. Warm and relaxed equals greater functionality.
How do I warm up before my guitar lesson or guitar practice?

First start with some stretches for your wrists, hands and fingers. Then I'll give you some hands on guitar warm up tabs you can implement in your practice.

There are a lot of them so don't try to cram all of them into one practice session. Focus on like one or two a week until you're very comfortable with them and then just experiment with different combinations. Make up your own if you like, The possibilities are really endless.

Sunday, March 14, 2010

Relaxing with the Guitar

Physical relaxation

Relaxing is probably one of the most important guitar techniques you can develop for playing guitar. But it is also one of the most difficult to master. It's not normally a part of anyone's guitar lessons either. But it its important.


You only play guitar your best and are able to improve maximally when your body and mind are completely relaxed. Any tension and you simply won't be able to play your best. Unfortunately, tension has a way of creeping into your guitar playing unexpectedly. Right now relax your shoulders. I bet you didn't even realize you were that tense. Did you?


Well, when you're playing the guitar we're going to try to train ourselves to recognize that tension. Actually that's the easy part. Better yet, I'm going to give you some techniques on and off of the guitar fretboard to help train yourself to be able to relax.


There is physical relaxation and mental relaxation. They are interdependent. If you have relaxation in one of these areas, you'll get it in the other. The trick is to be able to relax at will. These techniques will help not only to improve your guitar technique: speed, clarity and coordination, they will also help if you play out and maybe have a little stage fright. You should practice these techniques regularly because the better you are at relaxing, the better you'll be able to play guitar.


Tension normally starts at the base of the head at the top of your neck and spreads from there throughout the body. This is very important because it's very convenient for tension to travel down to the shoulders, through the arms and to the hands. That's when your guitar playing becomes hindered. So the first thing to start thinking about regularly is... neck and shoulders


These are the two areas that most affect the rest of your body. The next is... the back


To start out, I want you to begin your guitar practice sessions proactively thinking about relaxing your neck shoulders and back. The rest of your body should follow suit. Next we are going to look at a more active approach to learning to induce a relaxed state.


Technique for Physical Relaxation for Guitar

Progressive relaxation:

This a technique that relaxes the entire body. Starting with your feet, flex as hard as you can for 5 full seconds. Now relax. Wiggle your toes. Now flex your calves for a full 5 seconds, massage them out. Now your thighs for 5 seconds. Massage them out. Now your chest, your shoulder, your back. Do this for every part of your body. After you flex each part, relax it and either massage it out or shake it out. After you finish you should feel your muscles a bit more loose. I use this technique when I'm feeling a lot of nervousness or tension.


Light relaxation:

I've found this exercise to be a little bit more help in recognizing even the slightest tension. You go through the exact same process you did for the last exercises but this time don't tense as hard as possible. Just tense or flex enough so that you feel that slight tension. After 5 seconds release. You should definitely feel more relaxed that you did before. This is the kind of tension that creeps in while you're playing the guitar. So practice this daily. I usually do it before my practice sessions.


On the guitar fretboard:

Now we'll go to your guitar's fretboard. Play any chord. Now play that same chord after doing the light relaxation method above. What was different?


This time play the same chord. Squeeze the neck of the guitar as hard as you can. How does it sound? Not bad probably. Now play the same chord. But this time just barely place your thumb on the back of the neck. How much pressure does it take to clearly play the chord? Not nearly as much and you probably get a clearer sound.


Now play two chords sequentially squeezing the neck as hard as possible. How easy is it to change chords? Okay do it the other way just barely touching the back of the neck. How much easier is it that way? How did it affect the sound you created?


I've found the lighter the touch, the easier the change in position on the fretboard and the more articulate the sound. Plus the lighter the touch, the more relaxed you feel and the more speed and dexterity you have. Actively practice letting up on the strings.


Mental Relaxation

This is key to performing and indeed, to becoming relaxed physically. I used to compete in martial arts tournaments and I can tell you definitively that if you get into the ring unprepared mentally, you will embarrass yourself and possibly get hurt. Whoever is prepared mentally usually wins the fight. To perform well you must be relaxed and prepared. Now that may be a bad analogy because music is not a competition. It's quite the opposite actually. It's a cooperation between you and whomever you're playing with. But more importantly it's a cooperation between you and your instrument to create something beautiful. And this is where we'll start.


Techniques for Mental Relaxation

Thought Process:

You're thought process must change. Before you pick up your instrument or go out on stage or whatever, you have to realize why you are going to do what you are about to do. For me when I go out on stage I go out to serve. I'm not serving myself. People are expecting to be moved in some way, whether it be spiritually, rhythmically, emotionally or any other way. My job is to serve those people. And because I consider music a spiritual endeavor, I play to worship. Whether you do or not is not my business. But what I've found is that when I take myself out of the equation and begin to form a relationship with the One whom I worship and with the audience, who is waiting for an experience, I become one with the music. The music flows more easily and the audience responds to that relationship. And guess what, my nervousness vanishes a lot. It's when I focus more on what I'm doing and how the audience is viewing me that I lose the music and it ends up sounding like... crap basically.


So your thought process is the single most important aspect of mental relaxation. Focus on the reason you play, feel the music and forget about the audience and yourself. Practice this attitude and you will certainly find it easier and easier to relax as time goes on.


Relaxation Imagery and Breathing

These two techniques go hand in hand and I'll explain in this segment. You may find this awkward or different at first but I promise if you stick with it will pay off. You've all heard take a deep breath and count to ten, well that a start but you can do more to relax. This exercises will help you to recall that relaxed feeling that you've experienced in the previous exercises when you're playing.


Here's the process.
  1. At night when you're lying in bed and everything is quiet, no wife, no kids, no TV, no X-box or whatever, close your eyes and slow down your breathing. Breath deeply but not exceedingly that you get dizzy.
  2. Try to eliminate all of the day's thoughts out of your head. Focus only on your breathing and your body.
  3. Clear your mind.
  4. Repeat in your head the word relax... over and over and over again. You'll feel yourself slipping into a pretty relaxed state.
  5. Now think of your toes. Try to feel your pulse in them. Even if you can't feel the pulse you'll start to feel just a hint of a tingle and maybe a little heaviness.
  6. Now move up to your feet and calves, all the while telling yourself to relax and breathing slowly.
  7. Continue on throughout your whole body, hitting every body part while telling yourself to relax.

I usually never make throughout the whole body. I usually fall asleep before that happens but the more and more I do this exercise, the more easily it is to recall that relaxed state. All I do is say the word relax and I slip into a more relaxed state and my breathing slows down and gets deeper. Try it, it may work for you.


Conclusion

That's it for the Relaxation segment. Hopefully you can incorporate some of this information into your guitar practice regimen or your life.


Just remember that the most important thing is that you try to relax. Your playing will improve. These are just some examples of ways you can try to learn to be aware of tension in your body and then work to eliminate it.


This section in particular may help you aside from guitar playing. Although it certainly helps me on the fretboard, I find these useful for life in general. Because eventually if you are a serious musician or intend to become a serious musician, you'll realize that every aspect of your life somehow ties into your playing and musicianship.

Friday, March 12, 2010

Rasgueado Technique

What is a rasgueado?

A rasgueado is a method of strumming the strings of the guitar but it is much more complicated than the typical western style strumming. Because you use all five of your fingers, you are able to add an innumerable amount of rhythmic variations and patterns.


Are there different types of rasgueados?

Yes there are. There can be rasgueados that are simply embellishments or can serve as an integral part of the rhythmic structure of your song. And there are many different finger combinations you can use to execute a rasgueado.


What is the most important part of playing a rasgueado?

That really depends on the purpose of its use. For example, if you are trying to build tension you want to focus on evenness in the finger movement (much like the importance of a tremolo) with increasing volume. If you'd rather use it as a quick explosive technique that livens your song you'll need to practice the attack and the power with which you attack.


How do I play a rasgueado?

Well let's start with the movement of the fingers. You want to maintain looseness in your hand so you don't restrict your movement and so that it is easier to stay in a continuous, fluid motion. If you want a noncontinuous rasgueado, rest your thumb on the low E string. Starting with your pinky, release it explosively across as many strings as you can. Follow it with the ring finger immediately and then the middle finger and then the index. Don't worry about hitting all strings, no one is counting. What you're looking for is the rattatattat of the strings. It should sound explosive. We'll look below for technical notes of the continuous rasgueado. There are many, many combinations of finger movements.


Remember that the exercises here are to condition your fingers to be able to more easily perform rasgueados, they are not necessarily found in traditional Flamenco guitar. They are simply an exploration of incorporating flamenco styling into your playing.


Technical Notes for Ornamental Rasgueado
  • fingers, while relaxed, should shoot like a ballistic across the strings to create and explosive sound.
  • the thumb can rest on the 6th string but it is not absolutely necessary
  • movement should occur from the knuckle of the hand, not the finger... in other words the fingers should end almost, if not completely, straight after extension
  • energy should come from the fingers and the hand, not necessarily the wrist (if your thumb is resting on the 6th string, you won't be able to generate movement from the wrist anyway)
Technical Notes for Continuous Rasgueado
  • With the single and the 2 finger exercises, you'll note that the rasgueado exercises that include the pinky and the ring finger are more awkward. This is normal. It may feel a bit more comfortable if you make sure that you're bending your pinky and your ring finger at the hand and not breaking it mid-finger at the middle joint.
  • And try not to lock the pinky but keep it relaxed.
  • Also if you do make a fist, you should almost really flick your fingers out as if you were flicking someone.
  • This certainly will create more volume if that's the effect you're going for.
  • With the continuous rasgueado you should rely more on the rhythm of the wrist than the hand as in the ornamental rasgueado.
  • In the 5 finger rasgueado, especially when the thumb follows the index down and then back up, at the bottom point the hand should pivot so it faces towards the back of the guitar. Then it should sweep back up. Think of moving it in a figure 8.
  • A lot of the movement of the rasgueado is similar to the tremolo technique. Practice both and try to find those similarities.
  • In the 4 finger rasgueado with the t x i t pattern. I have it written that the last t motion can come up. You can also rake the strings with the thumb on the way down as well... anyway try it you'll see the difference. If the exercises seem odd or awkward, give them some time and try to keep up with them. Remember these are to help build your attributes and coordination.
  • Start slow and build up speed. Your goal is to have your rasgueado sound like one continuous stroke.

rasgueadorasgueado


Further Study on The Art of Rasgueado

Tuesday, March 9, 2010

Tremolo Technique

The tremolo technique is one that people say you can judge the skill of a guitarist by. I don't know if I would go so far as to say that's the ONLY thing to use. But certainly once one has acquired a certain level of mastery of this guitar technique, it is a wonder to experience.

What is a tremolo technique?

Basically it's the rapid succession of the same note, played (in a row) by either three or four of your fingers on the right hand. Normally the thumb plays a bass note followed by the three notes. Sometimes the tremolo note changes as well as the bass notes.

Technical notes:

  • Try to strike the strings in a deliberate and controlled way. Don't just flail your fingers hoping to hit the string.
  • Use a metronome slowly and make each note clear and of equal volume to begin with.
  • After you feel good about your control begin to try to put emphasis on a particular note. Start with the first note, then the second, then the third.
  • Remember to try to have the majority of the movement come from your knuckles at the hand and not at the middle of the finger.
  • Try to keep your hand in line from the knuckle of your index finger down through the wrist and forearm.
  • Don't angle your wrist down, making your fingers perpendicular to the strings.
  • Use a light touch. It takes very little to get a clear tone.
  • The point of contact on the string should be in a horizontal or a slightly upward direction. For instance, the rest rest stroke requires that, when you strike it, your finger travel in a horizontal or slightly downward motion in order to rest the finger on the next string. You also dig into the string. Not so with the tremolo. You glaze over it lifting your fingers towards the palm.
  • Set the metronome to 150 or 125 depending on the lesson. And work your speed up. The important thing is to keep even and clear, speed will come.

tremolo


You can refer to my previous post: Complete Study Of Tremolo For The Classic Guitar

Sunday, March 7, 2010

A Good Starter Guitar

Besides practice, a good starter guitar is probably the single most important element in successfully learning to play the guitar. Whether for yourself or as a gift for someone else, the right guitar is crucial, especially in the beginning stages. Many people think, "I'll start off cheap and, if I'm any good, I'll get a better one later." This approach rarely succeeds. The best chance for success comes when you plan for success right from the start.


If possible, get your guitar from a reputable music store. A guitar from a music store might cost a little bit more, but if you have any problems, the staff at the music store will be there to help. With the Internet, a department store, or a pawn shop, you can't expect individualized help if you have a problem. Especially for beginners, the extra support that a real music store provides can be worth its weight in gold.


You don't need to spend a lot of money to get a good starter guitar, but you should plan to get the best guitar you can afford. The first three or four months of learning are crucial. If the guitar breaks or otherwise quits during the beginner phase, most people will simply get discouraged and give up. Don't let that happen to you. Quality can be very affordable if you know what to look for. Poor quality is usually the most expensive of all.


Buying a guitar can be compared to buying an automobile. Fortunately it's a lot less expensive. As with selling cars, most people who sell guitars work on commission. A friendly, helpful sales staff should be an important element in your buying decision, but you shouldn't rely on the sales staff as your sole source of information. If you have access to someone knowledgeable about guitars whom you trust, ask for his or her help.


For most beginners, a new guitar with a factory warranty will be the best way to go. A used instrument can save you money, but even to a trained eye, there can be hidden problems that will leave a beginner stranded. Most reputable music stores sell extended warranties on their used instruments, just be sure to compare the total cost, including the cost of the warranty. A one-year warranty is usually plenty, but remember that one good guitar that works is worth a thousand broken ones under warranty. Unless you are absolutely certain that a used instrument will get you where you want to be, a new guitar with a factory warranty is the safest bet.


Hopefully you have some ideas about whom you can ask for help, as well as some guitar stores in your area. The next step is to decide what kind of guitar to get. I usually recommend that beginners start by making a list of music they like. Once you have your list, try and determine what kind of guitars are being used for the majority of music on your list. You want to get a guitar that is capable of playing most of the music you like. If 90% percent of the music on your list uses electric guitar, you should probably start with an electric guitar. If you like classical, folk, or Spanish music, start with a classical guitar. Get a guitar you like. It's more fun to practice on a guitar that you like, and the more you practice, the sooner you will be playing the music you like, too.


The three main types of guitars are: 1) Classical 2) Acoustic, and 3) Electric.


Classical Guitar


The vast majority of guitar teachers recommend starting with a classical guitar, even if you don't plan to play classical music. This does not mean that you must start with a classical, but since it is the traditional approach, it is worth considering seriously. Classical guitars tend to be less expensive than comparable acoustic or electric guitars, so if you're on a budget, a classical guitar is an excellent choice. Classical guitars use nylon for three of the strings, making them easier on the fingers, and they have a softer sound than other types of guitars. Also, nylon strings tend to last longer than other types of strings, meaning lower cost of ownership in the long run. Most Spanish and Latin music is played on classical guitar, and classical guitars are popular in folk and country music, too. Of course, classical guitars are preferred for classical music. Note: Do not try to put steel strings on a classical guitar. Classical guitars are not designed for the extra tension of steel strings, and steel strings can permanently damage a classical guitar. If you want the brighter, louder sound of steel strings, get an acoustic guitar. Reliable brand names for starter classical guitars include Alvarez, Cordoba, and Yamaha.


Acoustic Guitar


It is a common misconception that "Acoustic" guitar means any type of guitar that is not electric, but this is not entirely correct. Acoustic guitar refers to a specific type of non-electric guitar that uses metal strings, typically made from steel or bronze. Metal strings are louder and have more "sparkle" than nylon strings, but they are harder on the fingers (ouch!) and tend to wear out sooner than nylon, adding to the long-term cost of ownership. Most acoustic guitars come with medium gauge strings from the factory, because medium strings tend to break less in shipping. Unfortunately, medium gauge strings are nearly impossible to learn on. For most beginners, extra light gauge strings will minimize discomfort and enhance the learning experience. If you have your heart set on the sparkly sound of an acoustic guitar, ask the music store to change the strings to extra light gauge before you take it home. If your music store does not provide string-changing services, ask one of the staff to recommend someone who does. Reliable brand names for starter acoustic guitars include Alvarez, Fender, and Yamaha.


Electric Guitar


Many parents resist electric guitar because they think it will be too loud. This is not true. Most student amplifiers have a headphone jack, allowing totally silent practice. If silent practice is a requirement, an electric guitar is actually the best choice. Electric guitars can make many sounds not possible with acoustic or classical guitar. The difference between electric and acoustic guitar is similar to the difference between saxophone and clarinet. The fingerings are essentially the same on both instruments, but they sound totally different. If you want to play saxophone, you should get a saxophone, not a clarinet. In the same way, if you want to play electric guitar music, you won't be happy with a classical or an acoustic guitar. The main drawbacks to electric guitar are that it requires an amplifier, so start-up costs are higher, and a beginner can easily become overwhelmed by all the switches and options available with electric guitar. Starting on electric guitar means that the student must learn the electronics at the same time as learning the guitar. It is not practical to describe all of the different options here in this limited space, but I will urge beginners to avoid guitars equipped with a "tremolo" or "whammy bar." Whammy bars are fun, but they make it harder to keep the guitar in tune and cause the strings to wear out faster, too. Tuning is the first major challenge all beginners face, so I advise against trying to learn on a tremolo-equipped guitar. The opposite of a tremolo guitar is called a "hardtail" guitar. For beginning students who want to start with electric, I strongly recommend starting with a hardtail. Good hardtail electric guitars include the Telecaster, Les Paul, and SG.


General things to look for in a starter guitar


1) Strings close to frets. The distance between the strings and the frets is known as the "action." The action should be no more than 5 mm at the highest point, preferably around 3 mm. A guitar with a high action will be more difficult to play. For beginners who do not have calluses yet, high action can be a show-stopper. Make sure the action is as low as possible.


2) Extra-light or low-tension strings. Many experienced players actually prefer medium or high-tension strings because they are louder and may last a bit longer. However, they are also much harder to press down and will discourage most beginners. Start with extra-light or low-tension strings, and gradually work up to higher tension.


3) Smooth, well-oiled tuning keys. If the guitar won't stay in tune, even if you're doing everything else right, it won't sound right. This is more common with cheap department store guitars, but even good quality used guitars can have this problem. Worn out or defective tuning keys can be very frustrating for a beginner, and this is an example of why a new instrument with a factory warranty is usually the best choice for a starter.


4) No cracks, especially around or under the bridge, where the strings attach to the guitar body. With older guitars, the bridge can start to lift or pull up from the body of the guitar, creating a small air space under the bridge big enough to slip a piece of paper, sometimes bigger. If the bridge is pulling up or there are any visible air spaces or cracks, the guitar needs to be repaired by a professional. A lifted bridge will make the guitar much harder to play, and continuing to play a guitar with a lifted bridge risks permanently damaging the guitar. If shopping for used guitars, be aware that bridge repairs often cost more than a brand new guitar.


Recommended Accessories


* Electronic Guitar Tuner (Korg GA-30, Boss TU-80). An electronic tuner will help shorten the learning curve, and help you sound better faster. If you have a choice between a guitar tuner and a chromatic tuner, get the guitar tuner. Chromatic tuners are useful if you already know how to tune your guitar, but guitar tuners are easier for beginners.


* Three (3) extra sets of strings. Extra-light gauge for acoustic and electric, low tension for classical. Breaking strings is part of the learning curve, so be prepared to break a few.


* Pegwinder. This is a gadget that you will need for changing guitar strings. You don't need the fancy one, the simple ones work fine. After you have used a pegwinder, it's hard to imagine not having one.


* Gig-bag type soft case, for protection and easier carrying. The ones with padding and a shoulder strap are best.


* Heavy gauge picks. If you plan to play with a pick, start with a heavy gauge pick. Thin or medium gauge picks tend to bend, making it harder to develop picking accuracy. Once you develop accuracy, you will probably want to try as many different styles of picks as possible. In the beginning, start with heavy picks, they're easier.


Optional Accessories


* Hard case. Offers more protection but is heavier and more awkward to transport.


* Guitar stand. Provides a more prominent place to display the guitar, helping to remind you that the guitar wants to be played everyday. In homes with animals or small children, it is probably best to forgo the guitar stand and just return the guitar to its case after practice.


* Leather guitar strap. A guitar strap is not required right at first, but when you do get a strap, like shoes, leather will be more comfortable and last longer than nylon or plastic.


If all this seems like a lot to remember, print out these pages and bring them with you when go shopping.  Buying a guitar can be a lot of work, but it should be a lot of fun too.  And when you find the right one and bring it home, that's when the real fun starts!

Tuesday, March 2, 2010

Classical Guitar Practice Tips: Use Your Kinesthetic Sense To Produce Fruitful Results

Your kinesthetic sense (the sense that allows you to be aware of your touch (pressure), position, tension, and movement), helps you become keenly aware of the tension your muscles produce while you play. Without a well-developed kinesthetic sense, it will be difficult to achieve the balance of tension and relaxation that will ultimately lead to a better performance.


Many classical guitarists, particularly those in beginning and intermediate levels, have little awareness of their bodies. For example, classical guitar students focus so intently on reading the musical notes that they do not sense what their hands, fingers, and other parts of their body are doing.  As a result, some parts of their body become tense, causing the student to suffer fatigue, even pain.  Furthermore, the student’s anxiety about making mistakes often leads to tension, which in turn gives rise to the very errors the student feared in the first place.


With an increased awareness of your kinesthetic sense, you will learn how to play with minimum effort by merely watching and feeling your hands and fingers in a gentle, noncritical way.  Allow your hands to make adjustments without too many commands from your conscious mind. Unfortunately, however, it is not possible to solve every problem that you encounter as you play by simply observing your fingers, allowing them to find their own way.


For a more comprehensive and analytical trouble-shooting approach, first analyze the problem.  When you have located the cause of your difficulty, determine what technical approach will help you to overcome the obstacle.  Next, allow your fingers to work naturally, using your newly-developed kinesthetic sense.  Occasionally, play in front of a mirror, and observe how your body appears.  If it appears too tense, take deep breaths, or use whatever relaxation technique works for you.  If your body appears too sloppy, focus your attention on the job at hand.  Sometimes a short break may clear your mind and sharpen your focus.


Combine both methods of problem solving, both the kinesthetic and the analytic, for a more fruitful practice session.  By learning to engage more of your senses, you will become a better classical guitarist–and a better musician overall.


Emre Sabuncuoglu, one of the founders of the Los Angeles Guitar Academy Online, holds a Doctor of Musical Arts degree from the University of Southern California’s prestigious Thornton School of Music. Emre’s warm style of relating to others helps him reach out to a diverse student population. He incorporates visual, kinesthetic, and auditory cues to accommodate each student’s distinctive learning style. LAGA also has studios throughout the greater Los Angeles area where students can learn from Emre in person.

Article Source

How to Play Lightning Fast Classical Guitar

The first principle of speed on the classical guitar is the fact that whole pieces are not fast. Speed in compositions comes in bursts. This is the basic tenet of comparison. A piece played Largo might have Andante passages that are fast. But these Andante passages are slow if compared to a composition that is presto or prestissimo. So be aware that speed is not necessarily how many notes a second but more a factor of notes and phrases in comparison to each other.


Practice, Practice, Practice


You already know that practice is critical to speed. You have to practice your scales just for the practice, and you have to practice a wide variety of scales. Classical Guitar is like every other form of kinesthetic art; as you practice the motions you make will settle into deeper regions of your brain and your body will learn how to do it without you even thinking about it. With practice you will be able to blast out very fast scales that will amaze you.


Now, all of that sounds good but what about some practical advice on how to get faster?


This part is easy, and the single best thing you can do to improve your speed is to make a conscious attempt at finger crossing patterns with your right hand. This is usually the biggest challenge to playing speed. Practice, on a daily basis if possibleArticle Submission, crossing string patterns.


What are string crossing patterns?


This is the way you pick across the six strings with your right hand. If you are playing a scale and you transition from string to string with the right hand you will use a pattern such as playing the first string with your index finger then playing the second string with your middle finger. On to the third string you are back to your index finger and for the fourth string again back to the middle finger.


Avoid the same crossing patterns and create new ones


As you become aware of your finger crossing you will see that you have very distinct patterns that you use. You should create and practice new patterns that are not comfortable for you. This truly will dramatically increase your speed. A good example of a new pattern you might try is to switch your starting finger. When practicing scales you probably start the first note with your right hand index finger. And as you progress through the scale you cross scales in the same pattern. You should try starting the scale with your middle finger. This will totally change the crossing pattern you use for playing the scale and once you get a bit of practice like this your speed will increase significantly. Vary this crossing pattern in as many ways as you can and make sure you also do double strikes where you cross using the same finger.


To improve your playing speed on the classical guitar you have to practice and you have to bump yourself out of your normal routines of playing. But with some conscious effort you can significantly improve your speed.

Thursday, February 25, 2010

Yuki no Hana on classical guitar, composed by Matsumoto Ryouki

This song was a hit in Asia and probably is one of the most covered songs in recent years. Apart from the original singer Nakashima Mika, dozen of other artistes also covered the song, including Tokunaga Hideaki, Han Xue (in Mandarin, 飄雪) , Vincy Chan (in Cantonese, 花無雪), Fukuyama Masaharu, Iwasaki Hiromi, Kawamura Ryuichi, Joi Chua (in Mandarin, 對不起我愛你) et cetera

Monday, February 15, 2010

Solos for Classic Guitar - World's Favorite No. 43

Page 000


Edited by Harvey Vinson. For guitar. World's Favorite Series. Renaissance, Baroque and Classical Period. Difficulty: medium. Guitar solo book. Standard notation (no tablature) and fingerings. 127 pages. Published by Ashley Mark Publishing Company (MS.AS10043).


With standard notation (no tablature) and fingerings. Renaissance, Baroque and Classical Period. 9x12 inches.


86 titles including Prelude by J.S. Bach, Andante by Mozart, Bagatelle by Schumann, Pavana by Tarrega, Prelude by Coste, Nocturne De Salon by Carulli, and Dance Rondo by Giuliani.


Contents
  • Andante Composed by Wolfgang Amadeus Mozart, Wolfgang Amadeus Mozart
  • Allegretto Composed by Fernando Carulli
  • Rondo Composed by Fernando Carulli
  • Waltz Composed by Fernando Carulli
  • Andantino Composed by Fernando Carulli
  • Prelude in D minor Composed by Francesco Molino
  • Prelude in E Minor Composed by Francesco Molino
  • Prelude In Bb Major Composed by Francesco Molino
  • Spanish Ballad
  • Study In C Composed by Fernando Sor
  • Study In A Composed by Fernando Sor
  • Study In D Composed by Fernando Sor
  • Study In B Minor Composed by Fernando Sor
  • Study in A Minor Composed by Fernando Sor
  • Study In D Minor Composed by Fernando Sor
  • Study In G Composed by Fernando Sor
  • Study In Bb Composed by Fernando Sor
  • Leccion In A Minor Composed by Fernando Sor
  • Leccion In A Composed by Fernando Sor
  • Minuet In G Composed by Fernando Sor
  • Minuet In A Composed by Fernando Sor
  • Minuet In C Composed by Fernando Sor
  • Variations On A Theme By Mozart Composed by Fernando Sor
  • Allegro Composed by Mauro Giuliani
  • Maestoso Composed by Mauro Giuliani
  • Dance Rondo Composed by Mauro Giuliani
  • Cadence Composed by Mauro Giuliani
  • Moderato Composed by Mauro Giuliani
  • Adagio Composed by Dionisio Aguado
  • Caprice Composed by Luigi Legnani
  • Study In F Composed by Mateo Carcassi
  • Etude Composed by Napoleon Coste
  • Bagatelle Composed by Robert Schumann
  • Melody Composed by Robert Schumann
  • Recuerdos De La Alhambra Composed by Francisco Tarrega
  • Capricho Arabe Composed by Francisco Tarrega
  • Lagrima Composed by Francisco Tarrega
  • Mazurca Composed by Francisco Tarrega
  • Pavana Composed by Francisco Tarrega
  • Adelita Composed by Francisco Tarrega
  • Maria Composed by Francisco Tarrega
  • Marieta Composed by Francisco Tarrega
  • Leyeda Composed by Isaac Albeniz
  • Nocturne De Salon Composed by Fernando Carulli

Download:


Worlds Favorite Solos For Classic Guitar - TIFF + MIDI.rar

24 Outstanding Solos For Classic Guitar

Page 01 @ 400 dpi


Page 03 @ 400 dpi

Download

Saturday, February 13, 2010

Esteban Classical Guitar Vol 4 - 10

Download Here:

Vol 4

ESTEBAN Classical Guitar Vol 4.part01.rar
ESTEBAN Classical Guitar Vol 4.part02.rar
ESTEBAN Classical Guitar Vol 4.part03.rar
ESTEBAN Classical Guitar Vol 4.part04.rar
ESTEBAN Classical Guitar Vol 4.part05.rar
ESTEBAN Classical Guitar Vol 4.part06.rar
ESTEBAN Classical Guitar Vol 4.part07.rar
ESTEBAN Classical Guitar Vol 4.part08.rar
ESTEBAN Classical Guitar Vol 4.part09.rar

Vol 5

ESTEBAN Classical Guitar Vol 5.part01.rar
ESTEBAN Classical Guitar Vol 5.part02.rar
ESTEBAN Classical Guitar Vol 5.part03.rar
ESTEBAN Classical Guitar Vol 5.part04.rar
ESTEBAN Classical Guitar Vol 5.part05.rar
ESTEBAN Classical Guitar Vol 5.part06.rar
ESTEBAN Classical Guitar Vol 5.part07.rar
ESTEBAN Classical Guitar Vol 5.part08.rar
ESTEBAN Classical Guitar Vol 5.part09.rar
ESTEBAN Classical Guitar Vol 5.part010.rar


Vol  6

ESTEBAN Classical Guitar Vol 6.part01.rar
ESTEBAN Classical Guitar Vol 6.part02.rar
ESTEBAN Classical Guitar Vol 6.part03.rar
ESTEBAN Classical Guitar Vol 6.part04.rar
ESTEBAN Classical Guitar Vol 6.part05.rar
ESTEBAN Classical Guitar Vol 6.part06.rar
ESTEBAN Classical Guitar Vol 6.part07.rar
ESTEBAN Classical Guitar Vol 6.part08.rar
ESTEBAN Classical Guitar Vol 6.part09.rar

Vol 7

ESTEBAN Classical Guitar Vol 7.part01.rar
ESTEBAN Classical Guitar Vol 7.part02.rar
ESTEBAN Classical Guitar Vol 7.part03.rar
ESTEBAN Classical Guitar Vol 7.part04.rar
ESTEBAN Classical Guitar Vol 7.part05.rar
ESTEBAN Classical Guitar Vol 7.part06.rar
ESTEBAN Classical Guitar Vol 7.part07.rar
ESTEBAN Classical Guitar Vol 7.part08.rar
ESTEBAN Classical Guitar Vol 7.part09.rar

Vol 8

ESTEBAN Classical Guitar Vol 8.part01.rar
ESTEBAN Classical Guitar Vol 8.part02.rar
ESTEBAN Classical Guitar Vol 8.part03.rar
ESTEBAN Classical Guitar Vol 8.part04.rar
ESTEBAN Classical Guitar Vol 8.part05.rar
ESTEBAN Classical Guitar Vol 8.part06.rar
ESTEBAN Classical Guitar Vol 8.part07.rar

Vol 9

ESTEBAN Classical Guitar Vol 9.part01.rar
ESTEBAN Classical Guitar Vol 9.part02.rar
ESTEBAN Classical Guitar Vol 9.part03.rar
ESTEBAN Classical Guitar Vol 9.part04.rar
ESTEBAN Classical Guitar Vol 9.part05.rar
ESTEBAN Classical Guitar Vol 9.part06.rar
ESTEBAN Classical Guitar Vol 9.part07.rar
ESTEBAN Classical Guitar Vol 9.part08.rar

Vol 10

ESTEBAN Classical Guitar Vol 10.part01.rar
ESTEBAN Classical Guitar Vol 10.part02.rar
ESTEBAN Classical Guitar Vol 10.part03.rar
ESTEBAN Classical Guitar Vol 10.part04.rar
ESTEBAN Classical Guitar Vol 10.part05.rar
ESTEBAN Classical Guitar Vol 10.part06.rar
ESTEBAN Classical Guitar Vol 10.part07.rar
ESTEBAN Classical Guitar Vol 10.part08.rar
ESTEBAN Classical Guitar Vol 10.part09.rar

  ©

Back to TOP